Are you struggling with creating a Niteflirt listing? Does HTML coding mystify you? Would you like to learn a few basic tips that will help you get beyond nothing but basic text in your listing?
If so, this Quick HTML Tips series is for you. Today, I unveil Part One in the series – one big tip that can very quickly help you get up to speed with HTML. In future posts, we’ll get down into the weeds with some actual coding.
Quick HTML Tip #1 – Niteflirt’s Secret HTML Generator
Did you know there’s a secret HTML generator on Niteflirt that you can use to spruce up your listings? You won’t find a mention of it in Niteflirt’s HTML Basics section, nor do many people talk about it. It wasn’t actually designed for creating listings, but you can use it to get started on designing a great looking listing where you can easily add photos, buttons and links where you want them. No more run on paragraphs in plain black font on a blah background. No starting out with no pictures and no buttons to sell your goodies.
Is the suspense killing you yet?
Are you dying to get in on the secret?
Here’s the roadmap – click here to go to “Compose Mail” in the Niteflirt mail center.
See all those cute little buttons on top of the box where you type the body of your mail?
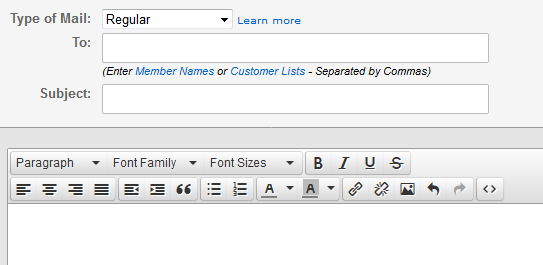
Those are for formatting your mail. As you may know, in a Niteflirt mail, you can change your fonts (lettering styles), add color to them and make them larger or smaller. You can add photos to your mail and create hyperlinks.
What you may not know is, while you are using this Rich Text Editor to create a nice looking email, the editor is creating HTML code “behind the scenes” that becomes part of your mail. You can see this HTML code by going to the bottom of the text box and clicking on “Problems? Use plain text mail”.
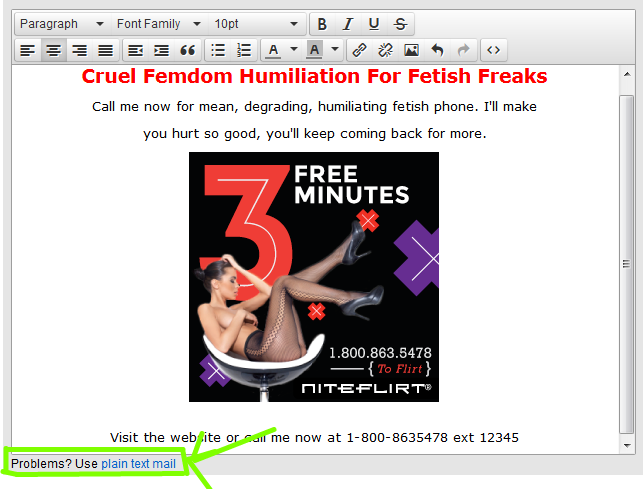
When you click “plain text mail” you will see the HTML code that is behind your formatted, prettied-up email design. It will look something like this:
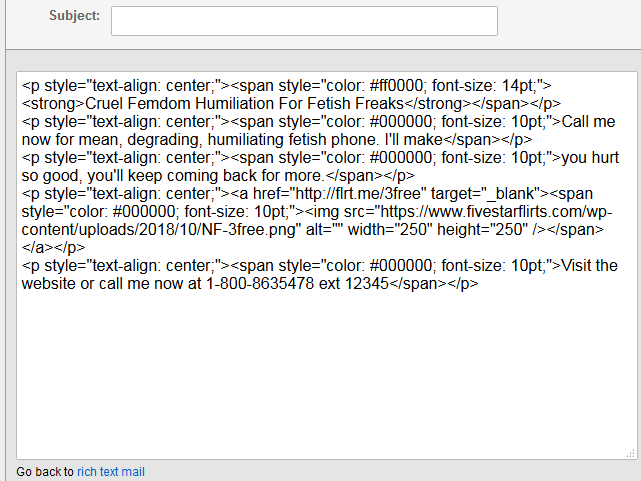
Now you’re ready to use the HTML to create your listing.
Hit select all (CTRL-A or right click to select all), copy (CTRL-C) and go to your listing and paste that code in. You might also want to save it to a Notepad file on your computer or in something like Google Docs.
It shouldn’t require changes but if you get the message that your HTML isn’t right and the second window with PREVIEW or USE THIS comes up, just hit USE THIS and keep going. When done, your listing should look like it did in the mail. You can always go back and play around with it some more, maybe even take a look at the coding to see what it does, if you aren’t familiar with HTML code at all.
Pros and Cons of Using the “Secret HTML Editor”
The “Pro” is obviously that you can get some nice formatting for your listings without knowing any HTML. And, it is a pretty quick method to do some simple “tricks” even if you do know how to code.
The “Secret HTML editor” will at least help you eliminate the “10 run-on sentences with no formatting and no photos” look in your listings.
But, you can’t do everything. Here are some of the “Cons”:
- You can’t make a colored background. The background color button in the email editor only highlights your text. It doesn’t make a full color background for the entire listing. There is a way around this but I will save that tip for the next post.
- Photos you want to use must already be in File Manager before you attempt this. You will need the URLs for your photos so before you start, you need to upload the photos to File Manager (or somewhere), grab the links and strip off the <img src=” at the front and the “> at the end. Your photo URLs need to start with http:// and have no quote marks or brackets. Then copy them into a Notepad file or similar so that they’re ready to use once you start creating your listing in the email editor. A bit complex for complete beginners but just take it slow, step by step and you’ll get it.
- You’ll have to practice a bit and tweak the code before you can really create complex “template” type designs but it CAN be done. In fact, fancy templates can be created and used for sending emails to your customers too.
- There is no character limit when you’re just typing in the box to make your listing. The character limit for your Niteflirt listings is 14,000 and for your homepage aka profile the limit is 7K. You can use my character counter at FLRT.me if you want to make sure you aren’t going over the 14K as you design the listing. It’s really easier to check yourself while your creating than having to go back when you’re done and remove stuff. If you have skills and want to create (or buy) email templates, the character limit for an actual sent mail is 9,000 characters.
That’s about it, no real downside, just a few caveats. I’ll post again sometime next week with a couple more tips for tweaking this code to get it to do more of what you want. Hope this is helpful and I would love to hear from readers with requests for future tips. Happy coding!